(Created page with "---- <u>'''Nota:'''</u> si usted tiene la aplicación “Bonjour” instalada en su computadora, el Webserver aparecerá automáticamente entre los sitios detectados por dicha...") |
(Created page with "Si desea instalar el plugin manualmente, por favor descargue el último instalador en la dirección siguiente: <br />") |
||
| Line 23: | Line 23: | ||
<br /> | <br /> | ||
| − | + | Si desea instalar el plugin manualmente, por favor descargue el último instalador en la dirección siguiente: | |
| − | <br/> | + | <br /> |
http://apple.com/support/downloads/bonjourforwindows.html | http://apple.com/support/downloads/bonjourforwindows.html | ||
Revision as of 16:42, 3 October 2016
Cómo utilizar el Webserver
El iPad/iPhone debe estar conectado a través de una red Wifi, la cual debe ser la misma red a la que esté conectada su computadora (PC/Mac)
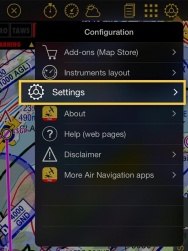
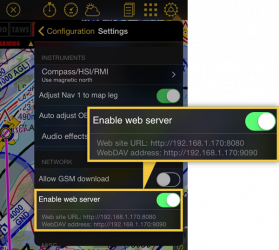
El servidor Web tiene que estar activado en los «Ajustes» mediante la activación de la opción «Activar WebServer». Debajo de la misma, aparecerá una dirección IP (ver imagen). Ejemplo: http://192.168.46:8080


Para acceder al Webserver, escriba la dirección IP en la barra de URL de un navegador Web razonablemente actualizado (Firefox 3, Safari 4, Explorer 8, etc) de su computadora. El sitio de Air Navigation Pro debería aparecer en su navegador.
Si no pueden conectarse, intenten con diferentes navegadores.
Nota: si usted tiene la aplicación “Bonjour” instalada en su computadora, el Webserver aparecerá automáticamente entre los sitios detectados por dicha aplicación. En este caso, no es necesario escribir manualmente la dirección IP. Bonjour es instalado automáticamente en las Mac, en Windows se instala junto con el iTunes.
Si desea instalar el plugin manualmente, por favor descargue el último instalador en la dirección siguiente:
http://apple.com/support/downloads/bonjourforwindows.html
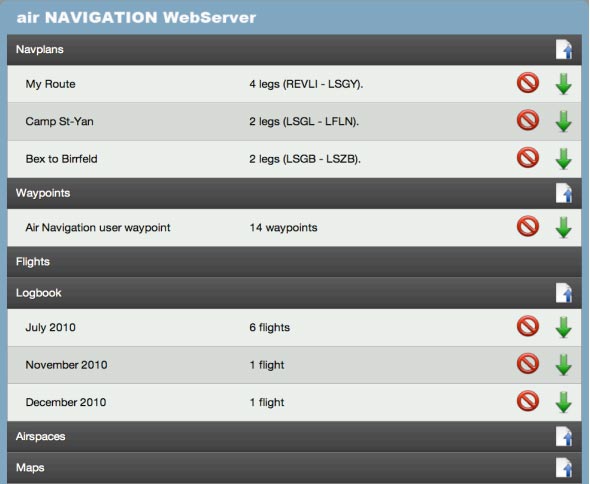
On the browser, available data is grouped by type: Navigation plans, Waypoints, Airspaces, Recorded flights, Logbook.
Tap on a group bar to disclose its content. Some data types can only be uploaded or deleted (Airspaces or maps), some can only be downloaded and deleted (Recorded flights) and some others can be uploaded, downloaded or deleted (Waypoints, Navigation plans, logbook).
To download a file, press the green arrow on the right side of the file. The red circle is used to delete a file.
To import a file in a particular group, press the file icon with the blue arrow on the right side of the group name. A selection popup will appear on top of the page. On most browsers, after a file is selected, it will start uploading immediately. On older browsers, you may need to press the «Upload» button to start uploading.
To upload a PDF document and associate it to a specific airfield, you must add the ICAO code of the airport where you want the PDF to appear at the beginning of the pdf name ( Example: LSGG _Geneva_approach.pdf ). You can then upload the document in the «Appcharts» section. If Air Navigation cannot find an airfield matching the 4 letter prefix of the file, an error message will appear and the PDF will not be installed.
Format & Compatibility
You can also upload waypoints and airspaces using this feature. However, it is necessary to respect the file format. Please, click on the kind of data below for further information about its structure:
Back to previous page.
