Create a route
- Toggle to «Edit mode», a yellow and black striped bar should appear at the top of the moving map.
- To add waypoints, press on waypoints of your choice on the moving map. In the waypoint popup, press the «add to route» option. A yellow star should now appear on the moving map and your waypoint should be in the «Route» list.
- Alternatively, you can input one or more waypoint identifiers in the search field on top of the «Route» module and press return.
Multiple identifiers must be separated by a space.
Note: to find a waypoint near an airfield, typically VFR report points, you can use the following syntax: W@LSZG (waypoint id@airfield id) then return. This will force Air Navigation to find the closest waypoint from LSZG with the identifier W.
In Edit mode it is also possible to reorder and remove waypoints from the list in the «Route module». Alternatively, you can remove a waypoint by pressing on the map and choose the «remove from route» option. It is possible to insert a waypoint by pressing on the magenta vector (leg) and moving to a new location on the map. As a result a new waypoint will be inserted in the «Route». If the location on the map is not over an existing waypoint, a «temporary» waypoint will be created. You can add this waypoint later to the database if you wish to do so.
File:Appimage.jpg You can create a new waypoint by pressing 2 seconds at its location on the map. A popup will ask if you want to add this point to the database or simply use it as a “temporary” waypoint for the route or direct to.
In the «Route» module, you can press on the «Summary» line at the top of the list to set the route name and wind. The route name is used to identify a particular route in the «Route» list when they are saved. Wind and cruise speed information will be used to display estimated time and heading in «edit mode». In «flight mode» current speed as reported by the GPS will be used to compute estimated time. It is also possible to download the actual wind information for all the legs directly from the internet. The button at the top right corner of the window can be used to reverse the route or duplicate it. When you are satisfied with your route, you can toggle back to «flight mode», the route is automatically stored in the «Routes list».
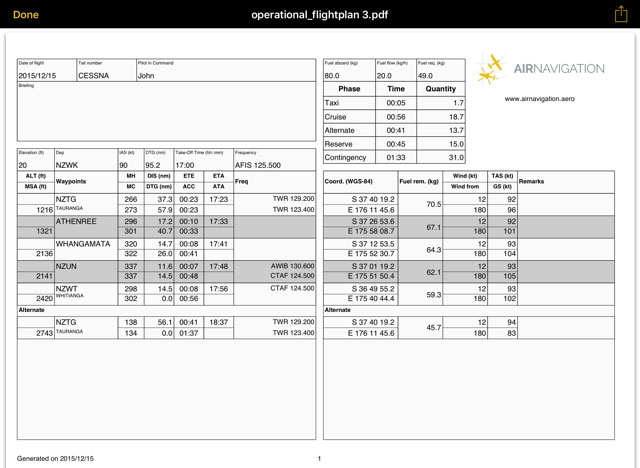
Operational Flightplan
The route created can be converted to a flight log that can be printed out or sent by E-Mail.
To use this function just tap on the Summary of the route and select the option "Flightplan" at the top right corner.
The flight log will display route information in an easy to read table mode together with other relevant information like MSA, FREQs, TAS, GS and Fuel requirements.
To print, send or share the Operational Flightplan just tap on the icon with the arrow on the upper right corner.
[page.]
