(Created page with "center <br /> ; Ajustes : Los ajustes serán aplicados principalmente al plan de vuelo operacional ; Redondea...") |
(Created page with "; Ancho del corredor : Configurar el ancho del corredor para calcular el MSA (Altitud mínima de seguridad). El corredor se verá como un área roja en el Elevation Graph/e...") |
||
| Line 67: | Line 67: | ||
: Imprime la fecha de vuelo y el ETA en el plan de vuelo operacional | : Imprime la fecha de vuelo y el ETA en el plan de vuelo operacional | ||
| − | ; | + | ; Ancho del corredor |
| − | : | + | : Configurar el ancho del corredor para calcular el MSA (Altitud mínima de seguridad). El corredor se verá como un área roja en el [[Elevation Graph/es|gráfico de terreno]]. |
[[File:Corridor_width.jpg|250px|center]] | [[File:Corridor_width.jpg|250px|center]] | ||
Revision as of 21:21, 3 November 2016
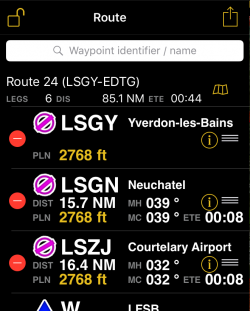
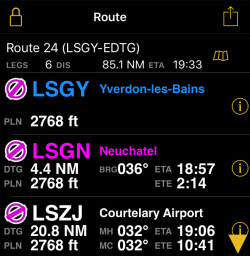
The Route Instrument shows the waypoints of the created route. Depending which mode of the app is activated the information shown is different. You can toggle between modes by tapping on the padlock icon on the left upper corner.
Contents
Edit Mode
- Al estar en modo editar, una barra se desplegará en la parte superior y se podrá buscar waypoints y agregarlos a la ruta. Se pueden agregar numerosos puntos separandolos por un espacio.
- Se podrá observar:
- Cantidad de piernas, distancia total y ETE dependiendo de la velocidad crucero de la aeronave y el viento.
- Curso magnético o verdadero (dependiendo de los Ajustes) entre las piernas y el rumbo si el viento ha sido actualizado desde el panel Totales.
- Distancia entre piernas
- ETE entre puntos dependiendo de la velocidad crucero de la aeronave y el viento.
- Presionando en el ícono rojo que se encuentra al lado del waypoint le permitirá eliminarlo
- Al presionar el nombre del waypoint, el mapa se centrará en él
- Se puede ver información sobre el waypoint y realizar distintas acciones presionando en la "I" amarilla.
- Al presionar en las tres líneas ubicadas al costado de los puntos, se podrán reordenar arrastrándolos hacia arriba o hacia abajo
- En un iPad, al presionar el triángulo amarillo ubicado en la esquina inferior derecha, se esconderá el segundo instrumento y solo se mostrará el instrumento de ruta en el costado izquierdo.
Al presionar en el número amarillo al lado del PLN se podrá configurar una altitud planificada para antes y después de llegar al waypoint. Si hay un cambio en la altitud sobre el waypoint, dos números aparecerán separados por una barra (/).
Modo de vuelo
- Al no estar en Modo Editar, se podrán ver las siguientes cosas:
- Waypoints que ya han sido sobrevolados en color azul
- El próximo waypoint en magenta
- Distancia desde la posición actual a los waypoints próximos
- Rumbo al próximo waypoint desde la posición actual
- Altitud planificada de sobrevuelo. Si ocurre un cambio en la altitud planificada en este punto, se mostrará dividido en antes y después con una barra (/).
- ETA, ETE al siguiente waypoint y ETE entre los próximos waypoints tomando en cuenta la velocidad de pista actual.
- Al presionar sobre un waypoint, se lo podrá seleccionar como el próximo y usarlo para los instrumentos.
- Se puede ver información sobre el waypoint y realizar distintas acciones presionando en la "I" amarilla.
Totales
La sección Totales mostrará el nombre de la ruta, aeropuerto de salida y llegada, cantidad de piernas, distancia y ETA. Al presionar en la ruta, un menú se desplegará con otras funciones.
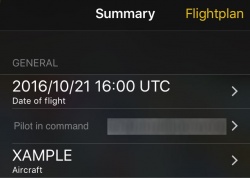
General
- Fecha de vuelo
- Desde aquí se configura el día y la hora de salida para esa ruta.
- Piloto al mando
- Se ingresa el piloto que volará la ruta.
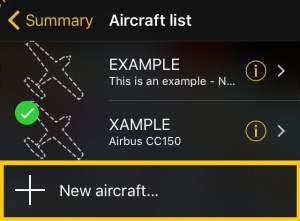
- Aeronave
- Se selecciona la aeronave para la ruta. Se puede crear un nuevo perfil de aeronave al presionar en "+ Agregar aeronave...".
- Ajustes
- Los ajustes serán aplicados principalmente al plan de vuelo operacional
- Redondear el tiempo de vuelo hacia arriba
- Se redondea el tiempo al minuto siguiente
- Tener en cuenta los ascensos y descensos en las estimaciones
- Se agregan penalidades de tiempo durante el ascenso y se bonifica en el descenso
- Mostrar ETA y fecha
- Imprime la fecha de vuelo y el ETA en el plan de vuelo operacional
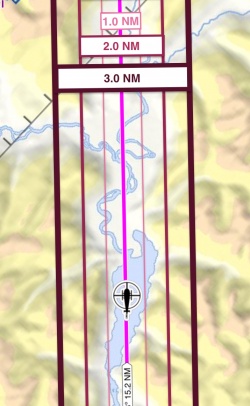
- Ancho del corredor
- Configurar el ancho del corredor para calcular el MSA (Altitud mínima de seguridad). El corredor se verá como un área roja en el gráfico de terreno.
- If you set a corridor width of 3NM, Air Navigation Pro will look for the MSA on the area belonging to a corridor of 3NM along the route. Keep in mind, that Air Navigation Pro uses the MSA to calculate the TAS. A higher MSA will mean a higher TAS.
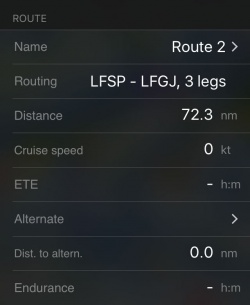
Route
- Name
- By tapping on this field you will be able to change the name of the route.
- Routing
- Departure, Destination and number of legs.
- Distance
- Distance of the Route.
- Cruise speed
- Information taken from the aircraft profile.
- Holding time
- Define a holding time. The time you select will be stored for your destination. The next time you fly to this airport Air Navigation will remember how much you set as "holding time".
- ETE
- ETE calculated with information from the aircraft profile.
- Alternate
- Select an alternate airport for the route.
- Dist. to altern.
- Distance to alternate from last WP from route.
- Endurance
- Calculates endurance once the fuel on board is entered.
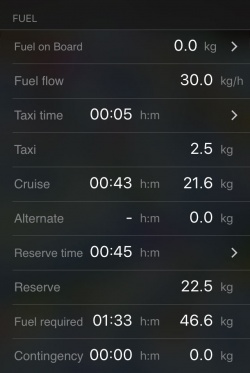
Fuel
- Fuel on Board
- Enter the fuel on board of the aircraft.
- Fuel flow
- Information gathered from the aircraft profile.
- Taxi time
- Sets taxi time.
- Taxi
- Calculates taxi fuel.
- Cruise
- Calculates cruise fuel for route.
- Alternate
- Calculates fuel needed for leg DEST - ALTN.
- Reserve time
- Allows you to set a reserve time (By default 45 mins).
- Reserve
- Calculates fuel for reserve.
- Fuel Required
- Calculates fuel for the trip taking in account taxi, cruise, alternate and reserve time.
- Contingency
- Endurance (Fuel on Board) minus Fuel required.
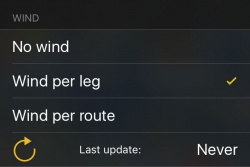
Wind
You can calculate the effect of current wind to your route. For the time being the wind calculates will be only the wind at ground level.
- No wind
- Don't take in account wind for the route.
- Wind per leg
- Downloads from the internet the current winds for your route legs. To push the service tap on the circled arrow at the bottom of this menu. This will take some seconds and the message "Last update: Never" will change to the current time.
- Wind per route
- Enter manually a direction and speed of the wind for the whole route.
Remember that you must download the Free Elevation data in order to calculate the Wind per leg info.
Operational Flightplan
The route created can be converted to a flight log that can be printed out or sent by E-Mail.
Legs
Will display information about the legs of the Route. While flying, it will display the actual distance and bearing to next waypoint.
Pressing the "i" at the right of every WP will show information of the WP and the option to select it or center it on the map.
Sharing
By tapping on the yellow square with the arrow pointing up you will be able to share the created route. You can share the route via:
- AirDrop
- iOS Native apps ilke Message, Mail or Notes
- Third party apps like Dropbox.
Back to previous page.
