(Updating to match new version of source page) |
(Updating to match new version of source page) |
||
| Line 2: | Line 2: | ||
<br /> | <br /> | ||
---- | ---- | ||
| + | The Route Instrument shows the waypoints of the created route. Depending which mode of the app is activated the information shown is different. You can toggle between modes by tapping on the padlock icon on the left upper corner. | ||
__TOC__ | __TOC__ | ||
<br /> | <br /> | ||
---- | ---- | ||
| + | ==Edit Mode== | ||
| + | [[File:Route_edit.PNG|250px|center]] | ||
| + | |||
| + | |||
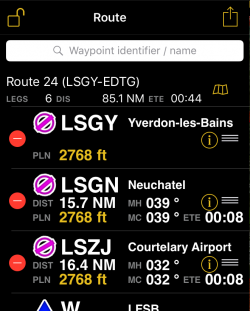
| + | *When in edit mode a bar will be displayed at the top where you can search for points and add them to the route. You can add multiple points separated by a space bar. | ||
| + | *You will see: | ||
| + | ** Number of legs and total distance and ETE depending on your aircraft cruise speed and wind. | ||
| + | **Magnetic or True course (depending on your [[Settings]]) between legs and Heading if the wind has been refreshed from the Summary. | ||
| + | **Distance between legs | ||
| + | **ETE between points depending on your aircraft cruise speed and wind. | ||
| + | *Tapping on the red icon next to the waypoint will let you remove a waypoint | ||
| + | *Tapping on the waypoint name will center the point on the map | ||
| + | *By tapping on the yellow "I" you will see the information of the waypoint and you can choose further actions. | ||
| + | *Tapping on the three lines next to the points and dragging p or down will let you reorder the points | ||
| + | *On iPad pressing on the yellow triangle on the right bottom corner will hide the second instrument and show only the route instrument on the left side. | ||
| + | <br /> | ||
| + | ===Vertical Navigation=== | ||
| + | Tapping on the yellow number next to PLN will let you set a planned altitude for before or after reaching the waypoint. If there is an altitude change over the waypoint 2 numbers will be displayed separated by a slash (/) meaning before/after. | ||
| + | <br /> | ||
| + | ---- | ||
| + | ==Flight Mode== | ||
| + | [[File:Route_flight.PNG|250px|center]] | ||
| + | |||
| + | |||
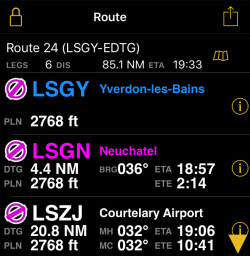
| + | *When not in edit mode the you will see: | ||
| + | **In blue waypoints you've already overflown | ||
| + | **In magenta the next selected waypoint | ||
| + | **Distance from your current location to the upcoming waypoints | ||
| + | **Bearing to the next waypoint from your current location | ||
| + | **Planned overfly altitude. If there is a planned altitude change at this point it will be shown with a slash (/) meaning before/after. | ||
| + | **ETA, ETE to next waypoint and ETE between upcoming waypoints taking in account your current groundspeed. | ||
| + | *Tapping on the waypoint will let you select it as next waypoint and use it for the instruments. | ||
| + | *By tapping on the yellow "I" you will see the information of the waypoint and you can choose further actions. | ||
| + | <br /> | ||
| + | ---- | ||
| + | |||
==Summary== | ==Summary== | ||
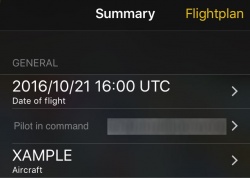
The Summary section will display the name of the route, departure and arrival airport, the number of legs, distance and ETA. When tapping on the Route a new menu will open with further options. | The Summary section will display the name of the route, departure and arrival airport, the number of legs, distance and ETA. When tapping on the Route a new menu will open with further options. | ||
| Line 21: | Line 58: | ||
[[File:summary_aircraft.jpg|300px|center]] | [[File:summary_aircraft.jpg|300px|center]] | ||
| + | ; Settings | ||
| + | : This settings will apply mainly to the [[Operational Flightplan]] | ||
| + | ; Round flight time up | ||
| + | : Always round times to the next minute | ||
| + | ; Account for climb/descent in time estimate | ||
| + | : Adds time penalties during climbs and bonuses during descents | ||
| + | ; Show ETA and date | ||
| + | : Prints date of flight and ETA on the operational flightplan | ||
| + | |||
| + | ; Corridor width | ||
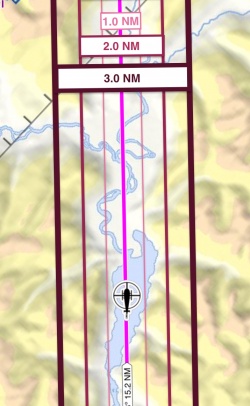
| + | : Set a corridor width for computing the MSA (Minimum Safe Altitude). The corridor will also be visible as a red area on the [[Elevation Graph]]. | ||
| + | [[File:Corridor_width.jpg|250px|center]] | ||
| + | |||
| + | |||
| + | : If you set a corridor width of 3NM, Air Navigation Pro will look for the MSA on the area belonging to a corridor of 3NM along the route. Keep in mind, that Air Navigation Pro uses the MSA to calculate the TAS. A higher MSA will mean a higher TAS. | ||
---- | ---- | ||
| Line 34: | Line 86: | ||
; Cruise speed | ; Cruise speed | ||
: Information taken from the aircraft profile. | : Information taken from the aircraft profile. | ||
| + | ; Holding time | ||
| + | : Define a holding time. The time you select will be stored for your destination. The next time you fly to this airport Air Navigation will remember how much you set as "holding time". | ||
; ETE | ; ETE | ||
: ETE calculated with information from the aircraft profile. | : ETE calculated with information from the aircraft profile. | ||
| Line 67: | Line 121: | ||
; Contingency | ; Contingency | ||
: Endurance (Fuel on Board) minus Fuel required. | : Endurance (Fuel on Board) minus Fuel required. | ||
| + | |||
---- | ---- | ||
| Line 82: | Line 137: | ||
---- | ---- | ||
| − | [[File: | + | [[File:warning_sign.png|caption|left]]Remember that you must download the Free Elevation data in order to calculate the Wind per leg info. |
---- | ---- | ||
<br /> | <br /> | ||
| − | === Operational Flightplan=== | + | === [[Operational Flightplan]]=== |
The route created can be converted to a flight log that can be printed out or sent by E-Mail. | The route created can be converted to a flight log that can be printed out or sent by E-Mail. | ||
| − | |||
| − | |||
| − | |||
| − | |||
| − | |||
| − | |||
| − | |||
| − | |||
---- | ---- | ||
| Line 100: | Line 147: | ||
===Legs=== | ===Legs=== | ||
Will display information about the legs of the Route. While flying, it will display the actual distance and bearing to next waypoint. | Will display information about the legs of the Route. While flying, it will display the actual distance and bearing to next waypoint. | ||
| + | |||
Pressing the "i" at the right of every WP will show information of the WP and the option to select it or center it on the map. | Pressing the "i" at the right of every WP will show information of the WP and the option to select it or center it on the map. | ||
| + | |||
---- | ---- | ||
| − | |||
| − | |||
| − | + | === Sharing === | |
| − | + | By tapping on the yellow square with the arrow pointing up you will be able to share the created route. You can share the route via: | |
| − | + | ||
| − | + | *[//support.apple.com/en-us/HT204144 AirDrop] | |
| − | + | *iOS Native apps ilke Message, Mail or Notes | |
| − | + | *Third party apps like Dropbox. | |
| − | + | ||
| − | + | ||
| − | + | ||
| − | + | ||
| − | + | ||
| − | + | ||
| − | + | ||
<br /> | <br /> | ||
---- | ---- | ||
Back to <u>[[Instruments|previous page.]]</u> | Back to <u>[[Instruments|previous page.]]</u> | ||
<br /> | <br /> | ||
| + | [[Category:Instruments]] | ||
Revision as of 16:14, 3 November 2016
The Route Instrument shows the waypoints of the created route. Depending which mode of the app is activated the information shown is different. You can toggle between modes by tapping on the padlock icon on the left upper corner.
Contents
Edit Mode
- When in edit mode a bar will be displayed at the top where you can search for points and add them to the route. You can add multiple points separated by a space bar.
- You will see:
- Number of legs and total distance and ETE depending on your aircraft cruise speed and wind.
- Magnetic or True course (depending on your Settings) between legs and Heading if the wind has been refreshed from the Summary.
- Distance between legs
- ETE between points depending on your aircraft cruise speed and wind.
- Tapping on the red icon next to the waypoint will let you remove a waypoint
- Tapping on the waypoint name will center the point on the map
- By tapping on the yellow "I" you will see the information of the waypoint and you can choose further actions.
- Tapping on the three lines next to the points and dragging p or down will let you reorder the points
- On iPad pressing on the yellow triangle on the right bottom corner will hide the second instrument and show only the route instrument on the left side.
Tapping on the yellow number next to PLN will let you set a planned altitude for before or after reaching the waypoint. If there is an altitude change over the waypoint 2 numbers will be displayed separated by a slash (/) meaning before/after.
Flight Mode
- When not in edit mode the you will see:
- In blue waypoints you've already overflown
- In magenta the next selected waypoint
- Distance from your current location to the upcoming waypoints
- Bearing to the next waypoint from your current location
- Planned overfly altitude. If there is a planned altitude change at this point it will be shown with a slash (/) meaning before/after.
- ETA, ETE to next waypoint and ETE between upcoming waypoints taking in account your current groundspeed.
- Tapping on the waypoint will let you select it as next waypoint and use it for the instruments.
- By tapping on the yellow "I" you will see the information of the waypoint and you can choose further actions.
Summary
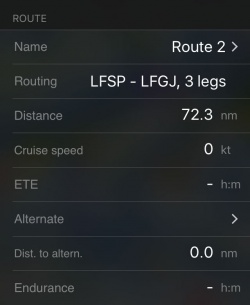
The Summary section will display the name of the route, departure and arrival airport, the number of legs, distance and ETA. When tapping on the Route a new menu will open with further options.
General
- Date of Flight
- Set the date and time of departure for this route.
- Pilot in command
- Set the pilot flying this route.
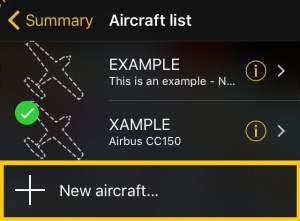
- Aircraft
- Select the aircraft for the route. You can create a new aircraft profile by tapping on "+ New aircarft...".
- Settings
- This settings will apply mainly to the Operational Flightplan
- Round flight time up
- Always round times to the next minute
- Account for climb/descent in time estimate
- Adds time penalties during climbs and bonuses during descents
- Show ETA and date
- Prints date of flight and ETA on the operational flightplan
- Corridor width
- Set a corridor width for computing the MSA (Minimum Safe Altitude). The corridor will also be visible as a red area on the Elevation Graph.
- If you set a corridor width of 3NM, Air Navigation Pro will look for the MSA on the area belonging to a corridor of 3NM along the route. Keep in mind, that Air Navigation Pro uses the MSA to calculate the TAS. A higher MSA will mean a higher TAS.
Route
- Name
- By tapping on this field you will be able to change the name of the route.
- Routing
- Departure, Destination and number of legs.
- Distance
- Distance of the Route.
- Cruise speed
- Information taken from the aircraft profile.
- Holding time
- Define a holding time. The time you select will be stored for your destination. The next time you fly to this airport Air Navigation will remember how much you set as "holding time".
- ETE
- ETE calculated with information from the aircraft profile.
- Alternate
- Select an alternate airport for the route.
- Dist. to altern.
- Distance to alternate from last WP from route.
- Endurance
- Calculates endurance once the fuel on board is entered.
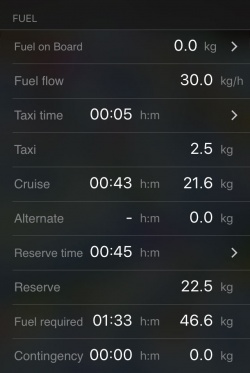
Fuel
- Fuel on Board
- Enter the fuel on board of the aircraft.
- Fuel flow
- Information gathered from the aircraft profile.
- Taxi time
- Sets taxi time.
- Taxi
- Calculates taxi fuel.
- Cruise
- Calculates cruise fuel for route.
- Alternate
- Calculates fuel needed for leg DEST - ALTN.
- Reserve time
- Allows you to set a reserve time (By default 45 mins).
- Reserve
- Calculates fuel for reserve.
- Fuel Required
- Calculates fuel for the trip taking in account taxi, cruise, alternate and reserve time.
- Contingency
- Endurance (Fuel on Board) minus Fuel required.
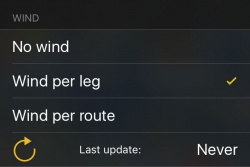
Wind
You can calculate the effect of current wind to your route. For the time being the wind calculates will be only the wind at ground level.
- No wind
- Don't take in account wind for the route.
- Wind per leg
- Downloads from the internet the current winds for your route legs. To push the service tap on the circled arrow at the bottom of this menu. This will take some seconds and the message "Last update: Never" will change to the current time.
- Wind per route
- Enter manually a direction and speed of the wind for the whole route.
Remember that you must download the Free Elevation data in order to calculate the Wind per leg info.
Operational Flightplan
The route created can be converted to a flight log that can be printed out or sent by E-Mail.
Legs
Will display information about the legs of the Route. While flying, it will display the actual distance and bearing to next waypoint.
Pressing the "i" at the right of every WP will show information of the WP and the option to select it or center it on the map.
Sharing
By tapping on the yellow square with the arrow pointing up you will be able to share the created route. You can share the route via:
- AirDrop
- iOS Native apps ilke Message, Mail or Notes
- Third party apps like Dropbox.
Back to previous page.
