(Created page with "Crear una ruta") |
|||
| (5 intermediate revisions by the same user not shown) | |||
| Line 2: | Line 2: | ||
<br /> | <br /> | ||
---- | ---- | ||
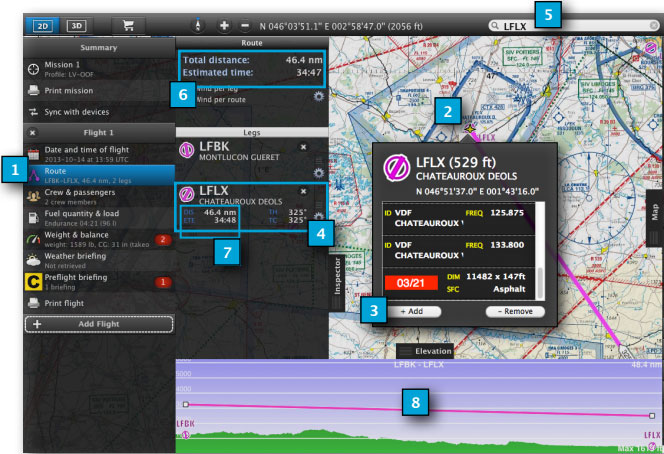
| − | + | Estos son los pasos a seguir para crear una ruta en Air Navigation Desktop: | |
| − | # | + | # En la pestaña “Mission”, seleccionar el módulo «Route» |
| − | # | + | # Elegir un waypoint del mapa que se desee agregar a la ruta |
| − | # | + | # Seleccionar el botón '''«Add»''' de la ventana emergente |
| − | # | + | # El waypoint será agregado a la lista de la ruta |
| − | # | + | # Como alternativa, se puede agregar un waypoint a través del campo de búsqueda |
| − | # | + | # La distancia total y el tiempo estimado aparece en la parte superior del módulo de ruta |
| − | # | + | # La distancia parcial y el tiempo estimado por pierna/tramo se muestra en la esquina izquierda de cada waypoint |
| − | # | + | # La ruta puede también ser representada en el gráfico de terreno. |
| − | <br/> | + | <br /> |
| − | [[File:danger.jpg|caption|left]] | + | [[File:danger.jpg|caption|left]] El gráfico de terreno mostrará la superficie sólo si los datos de elevación han sido descargados. |
| − | <br/> | + | <br /> |
| − | [[File:danger.jpg|caption|left]] | + | [[File:danger.jpg|caption|left]] Los tiempos estimativos se mostrarán sólo si la velocidad crucero fue ingresada en el perfil de la aeronave. |
| − | <br/> | + | <br /> |
[[File:mac1mac.jpg]] | [[File:mac1mac.jpg]] | ||
| Line 22: | Line 22: | ||
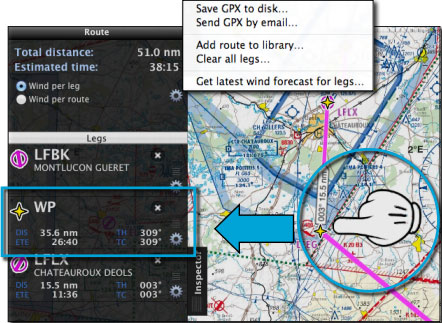
| − | + | En la parte superior de la pantalla hay un menú con las siguientes opciones: | |
| − | * Save | + | * Save GPX file to disc: guarda el archivo GPX en el disco |
| − | * Send GPX file by Email | + | * Send GPX file by Email: envía el |
| − | * Add route to the Library TAB | + | archivo GPX vía correo electrónico |
| − | * Clear route | + | * Add route to the Library TAB: agrega la ruta a la pestaña “Library” |
| − | * Get latest wind forecast | + | * Clear route: borra la ruta |
| − | <br/> | + | * Get latest wind forecast: obtiene el pronóstico del tiempo. |
| − | + | <br /> | |
| + | Es posible agregar waypoints intermedios manteniendo presionado el mouse y arrastrando la pierna/tramo hacia una posición en el mapa. | ||
[[File:create_aroute2.jpg]] | [[File:create_aroute2.jpg]] | ||
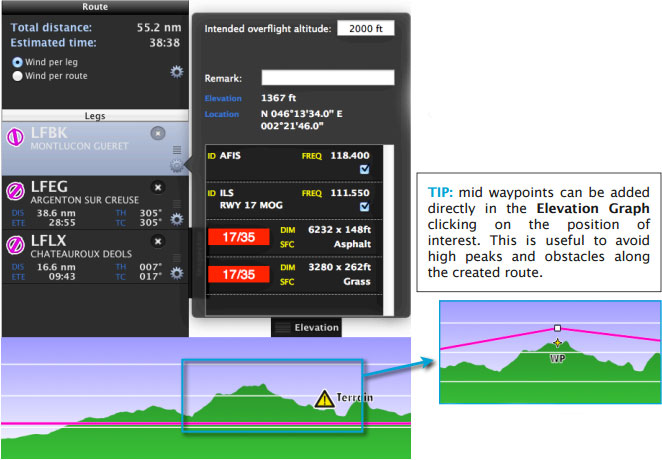
| − | + | Se puede tener acceso a una ventana con información para cada waypoint desde el módulo «Route». Allí pueden agregarse observaciones y establecerse la altitud de sobrevuelo prevista. | |
| − | + | ||
| − | + | ||
| − | [[File:danger.jpg|caption|left]] | + | [[File:danger.jpg|caption|left]] Los niveles de restricción son configurados desde la pestaña “Map” > módulo "Elevation". |
---- | ---- | ||
| − | <br/> | + | <br /> |
| − | + | Volver al <u>[[Air Navigation Desktop/es|índice]]</u>. | |
<br /> | <br /> | ||
Latest revision as of 20:22, 16 November 2015
Estos son los pasos a seguir para crear una ruta en Air Navigation Desktop:
- En la pestaña “Mission”, seleccionar el módulo «Route»
- Elegir un waypoint del mapa que se desee agregar a la ruta
- Seleccionar el botón «Add» de la ventana emergente
- El waypoint será agregado a la lista de la ruta
- Como alternativa, se puede agregar un waypoint a través del campo de búsqueda
- La distancia total y el tiempo estimado aparece en la parte superior del módulo de ruta
- La distancia parcial y el tiempo estimado por pierna/tramo se muestra en la esquina izquierda de cada waypoint
- La ruta puede también ser representada en el gráfico de terreno.
En la parte superior de la pantalla hay un menú con las siguientes opciones:
- Save GPX file to disc: guarda el archivo GPX en el disco
- Send GPX file by Email: envía el
archivo GPX vía correo electrónico
- Add route to the Library TAB: agrega la ruta a la pestaña “Library”
- Clear route: borra la ruta
- Get latest wind forecast: obtiene el pronóstico del tiempo.
Es posible agregar waypoints intermedios manteniendo presionado el mouse y arrastrando la pierna/tramo hacia una posición en el mapa.
Se puede tener acceso a una ventana con información para cada waypoint desde el módulo «Route». Allí pueden agregarse observaciones y establecerse la altitud de sobrevuelo prevista.
Los niveles de restricción son configurados desde la pestaña “Map” > módulo "Elevation".
Volver al índice.


