Line 10:
Line 10: # La distancie partielle et le temps estimé par vecteur magenta est affiché dans le coin gauche de chaque waypoint
# La distancie partielle et le temps estimé par vecteur magenta est affiché dans le coin gauche de chaque waypoint
# L’itinéraire peut être représenté dans le graphique du terrain
# L’itinéraire peut être représenté dans le graphique du terrain
+ <br />
+ [[File:danger.jpg|caption|left]] Le graphisme d'élévation affichera le terrain uniquement si les données d'élévation ont été téléchargées.
+ <br />
+ [[File:danger.jpg|caption|left]] Le temps estimé sera affiché tant que la vitesse de croisière sera réglée dans le profil de l'aéronef.
+ <br />
+ [[File:mac1mac.jpg]]
Latest revision as of 16:18, 25 November 2015
Information about message (contribute ) This message has no documentation.
If you know where or how this message is used, you can help other translators by adding documentation to this message.
Message definition (Create a route )
<br />
<br />
----
Here are the steps to follow in order to create a route in Air Navigation Desktop:
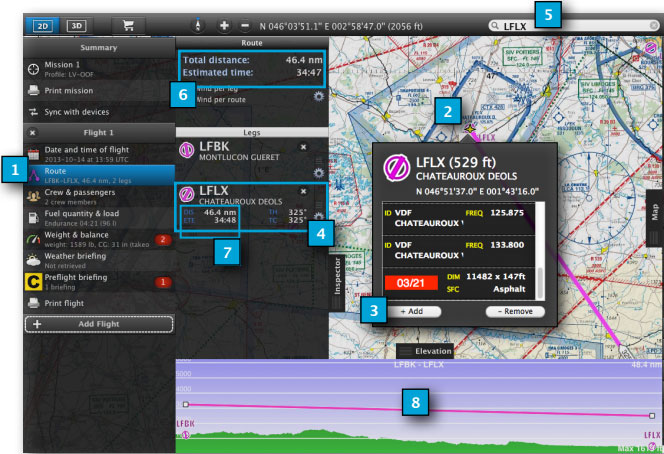
# Within the Mission TAB, select the Route module
# Choose a waypoint from the map that you wish to add to the route
# Click on '''«Add»''' button from the popup window
# The waypoint will be added to the Route list
# As an alternative, you can add a waypoint to the route through the search field
# Total distance and estimated time shows on the top of the Route module
# Partial distance and estimated times per leg show on each waypoint
# The route will be also represented in the elevation graph
<br/>
[[File:danger.jpg|caption|left]] The elevation graph will show terrain only if the elevation data has been downloaded.
<br/>
[[File:danger.jpg|caption|left]] Estimated times will show as long as the cruise speed is set in the aircraft profile.
<br/>
[[File:mac1mac.jpg]]
Translation <br />
Voici les étapes pour créer un itinéraire sur Air Nav Desktop:
Sélectionnez le module «Route» à partir de l'onglet “Mission”
Choisissez sur la carte le waypoint que vous désirez ajouter à l’itinéraire
Cliquez sur le bouton «Add» de la fenêtre pop-up
Le waypoint sera ajouté à la liste de l’itinéraire
Alternativement, il est possible d’y ajouter un waypoint en utilisant le champ de recherche
La distance totale et le temps estimé sont affichés dans la partie supérieure du module “Route”
La distancie partielle et le temps estimé par vecteur magenta est affiché dans le coin gauche de chaque waypoint
L’itinéraire peut être représenté dans le graphique du terrain
Le graphisme d'élévation affichera le terrain uniquement si les données d'élévation ont été téléchargées.
Le temps estimé sera affiché tant que la vitesse de croisière sera réglée dans le profil de l'aéronef.
