(Created page with "Criar uma rota") |
(Created page with "---- <br /> Voltar ao <u>índice</u> <br />") |
||
| (4 intermediate revisions by the same user not shown) | |||
| Line 2: | Line 2: | ||
<br /> | <br /> | ||
---- | ---- | ||
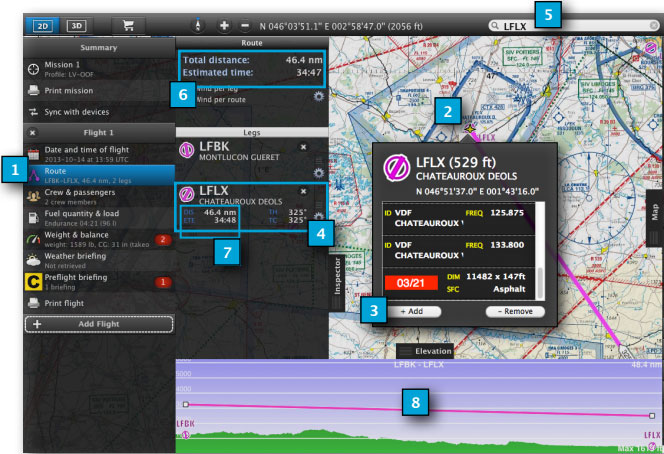
| − | + | Estes são os passos para criar uma rota em Air Nav Desktop: | |
| − | # | + | # Na aba “Mission”, selecionar o módulo «Route» |
| − | # | + | # Escolher um waypoint do mapa que você deseje adicionar a uma rota |
| − | # | + | # Selecionar o botão «Add» da janela pop-up |
| − | # | + | # O waypoint será adicionado à lista da rota |
| − | # | + | # Alternativamente, é possível adicionar um waypoint através do campo de pesquisa |
| − | # | + | # A distância total e o tempo estimado é mostrado na parte superior do módulo de rota |
| − | # | + | # A distância parcial e o tempo estimado por perna é mostrado no canto esquerdo de cada waypoint |
| − | # | + | # A rota também pode ser exibida no gráfico do terreno. |
| − | <br/> | + | <br /> |
| − | [[File:danger.jpg|caption|left]] | + | [[File:danger.jpg|caption|left]] O gráfico de terreno mostrará a informação só se os dados de elevação tem sido instalados. |
| − | <br/> | + | <br /> |
| − | [[File:danger.jpg|caption|left]] | + | [[File:danger.jpg|caption|left]] Os tempos estimados serão mostrado só se a velocidade cruzeiro for enchida no perfil da aeronave. |
| − | <br/> | + | <br /> |
[[File:mac1mac.jpg]] | [[File:mac1mac.jpg]] | ||
| Line 22: | Line 22: | ||
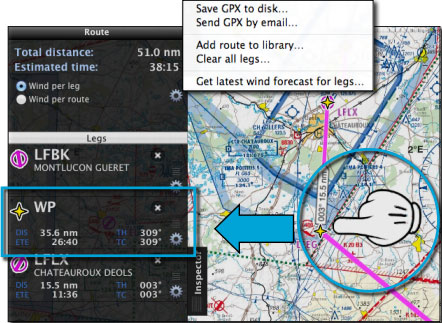
| − | + | No topo da tela fica o menu com as opções seguintes: | |
| − | * Save as GPX file to disc | + | * Save as GPX file to disc: armazena o arquivo GPX no disco |
| − | * Send GPX file by Email | + | * Send GPX file by Email: envia o arquivo GPX via correio eletrônico |
| − | * Add route to the Library TAB | + | * Add route to the Library TAB: adiciona a rota à aba "Library" |
| − | * Clear route | + | * Clear route: apaga a rota |
| − | * Get latest wind forecast | + | * Get latest wind forecast: para |
| − | <br/> | + | obter a previsão do tempo |
| − | + | <br /> | |
| + | Você pode adicionar os waypoints intermédios mantendo pressionado o mouse e arrastando a perna para uma locação no mapa. | ||
[[File:create_aroute2.jpg]] | [[File:create_aroute2.jpg]] | ||
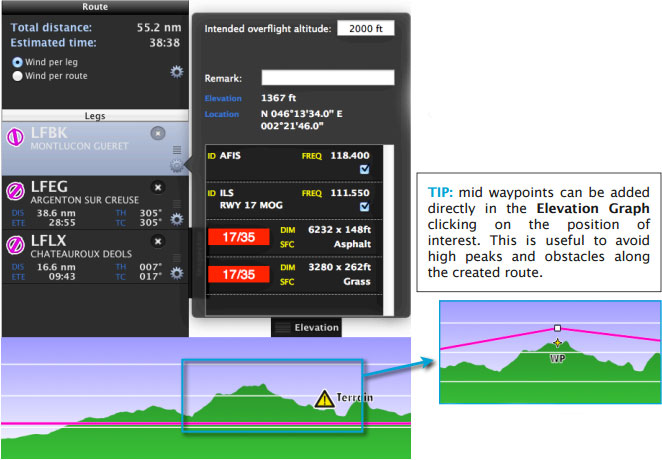
| − | + | É possível ter acesso a uma janela com informação sobre cada waypoint a partir do módulo «Route». Ali podem ser adicionadas as observações e indicar a altitude de sobrevôo prevista. | |
| − | + | ||
| − | + | ||
| − | [[File:danger.jpg|caption|left]] | + | [[File:danger.jpg|caption|left]] Os níveis de restrição são configurados a partir da aba "Map" > Elevation module. |
---- | ---- | ||
| − | <br/> | + | <br /> |
| − | + | Voltar ao <u>[[Air Navigation Desktop/pt|índice]]</u> | |
<br /> | <br /> | ||
Latest revision as of 15:37, 24 November 2015
Estes são os passos para criar uma rota em Air Nav Desktop:
- Na aba “Mission”, selecionar o módulo «Route»
- Escolher um waypoint do mapa que você deseje adicionar a uma rota
- Selecionar o botão «Add» da janela pop-up
- O waypoint será adicionado à lista da rota
- Alternativamente, é possível adicionar um waypoint através do campo de pesquisa
- A distância total e o tempo estimado é mostrado na parte superior do módulo de rota
- A distância parcial e o tempo estimado por perna é mostrado no canto esquerdo de cada waypoint
- A rota também pode ser exibida no gráfico do terreno.
No topo da tela fica o menu com as opções seguintes:
- Save as GPX file to disc: armazena o arquivo GPX no disco
- Send GPX file by Email: envia o arquivo GPX via correio eletrônico
- Add route to the Library TAB: adiciona a rota à aba "Library"
- Clear route: apaga a rota
- Get latest wind forecast: para
obter a previsão do tempo
Você pode adicionar os waypoints intermédios mantendo pressionado o mouse e arrastando a perna para uma locação no mapa.
É possível ter acesso a uma janela com informação sobre cada waypoint a partir do módulo «Route». Ali podem ser adicionadas as observações e indicar a altitude de sobrevôo prevista.
Os níveis de restrição são configurados a partir da aba "Map" > Elevation module.
Voltar ao índice


